
How To Remotely Fix a Device With a Duplicate IP Address
Maybe your intern configured a device with a static IP address that was already in use. Or maybe it was you (shh, I won’t tell). But don’t fret! Assuming your misconfigured device has remote access capability of some sort, you may be able to fix the problem without physically being on site!
If you can access the device you want to change the IP address on already, then go ahead and do so–this article isn’t necessary. However, if pinging or remotely connecting to the IP address only takes you to the device that needs to retain the IP address, read on!
You’ll need a packet capture tool like Wireshark (Windows and Mac OS X) or tcpdump (Linux) to begin with, so go ahead and grab that. Wireshark is available from www.wireshark.org and that’s what we will be using in this article. If you’re on the same network as the devices with the duplicate IP, you can run Wireshark or tcpdump on your own computer. If your misconfigured device is on another network, you’ll need to connect to a computer or server on that network and run Wireshark from there.
What we will need to do is view the ARP (Address Resolution Protocol) process in order to grab the MAC address of the device we want to connect to. ARP allows devices to send a broadcast (something that goes to all clients on the network) requesting the MAC address of a particular IP address. A network device needs both the MAC address (also called the physical address) and the IP address (also known as the logical address) in order to send most types of network traffic. If you have been pinging or trying to access the device with the duplicate IP on your same network, your computer has likely already associated the “wrong” MAC address to that IP address. You will know this if your attempts to connect to the device whose IP you want to change actually go to the device whose IP needs to be retained.
In our example, we have a situation mimicking what’s described above: two devices have an IP address of 192.168.1.101, and our attempts to connect to the one we want to change are sent to the device whose IP address should be kept. The first thing we want to do is clear the IP address to MAC address mapping that our computer has. We open up cmd.exe and type:
arp -a | findstr 192.168.1.101
The arp command allows you to interact with the ARP table on a Windows machine. We supply the -a parameter in order to display the ARP table on the screen. Once we “pipe” the output of the command to the findstr command and supply findstr with the relevant IP address, it ensures that the only lines that are printed contain that IP address. If nothing is returned for you, you’re good to move on. However, in our example, there is an entry here and it is for the wrong MAC address, so we need to clear it. We use the following command to do that:
arp -d IP_address_here
Again we are using the arp command, but this time we use the -d argument and supply the IP address again. This will clear the association of the IP address to the MAC address. We run the initial command again to make sure the mapping is indeed gone. If it isn’t, your computer is probably sending traffic to that address. You can either find the process that is sending traffic and stop it (maybe you left a ping running?), or just be aware that you will have to perform the arp -d step again later on. This is what my example cmd.exe window looks like after running the previous commands:
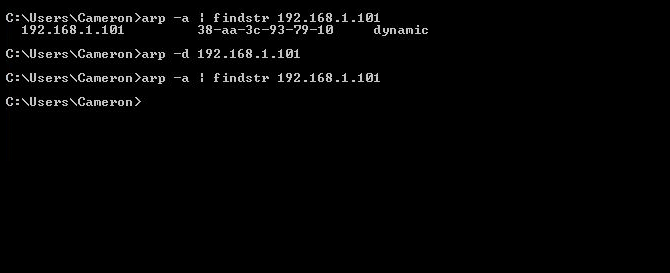
I found that there was an entry for the IP address, cleared it, and checked to make sure it was cleared. Our bad MAC address mapping is gone! Now we can run our packet capture tool and see the ARP process. Open up Wireshark and choose “Capture > Interfaces.” Select the box that represents your network interface and choose “Start” to begin capturing traffic. You should start seeing lines of packets show up. Don’t be intimidated if it’s moving quickly, we will cut down on the chatter! Let’s filter the traffic to see exactly what we want. In the filter field, copy and paste this line of text, making sure to press enter after pasting it in:
arp.src.proto_ipv4 == 192.168.1.101
Again, we are using 192.168.1.101 in our example. You will use the IP address of your devices instead. Your filter field (shown in green) should look like the one below, but you probably won’t see the ARP packets (lines 1730 and 1733 in the example picture) until you perform the next step, so don’t worry about that just yet. If your filter field is red, you’ve typed something wrong. The syntax is very important!
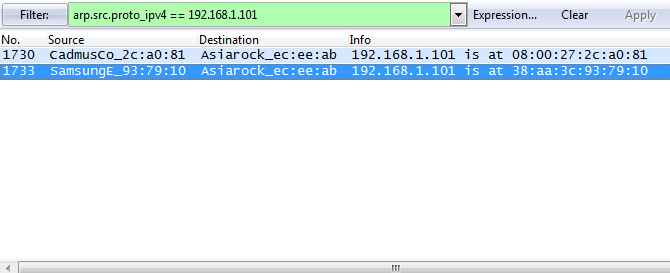
Using this filter, Wireshark will only display ARP traffic that has a sender IP address of 192.168.1.101. Now to force the ARP process, you can ping the IP address or attempt to send any traffic to it, like a remote connection, while the packet capture is still running. Pinging the IP address is probably the simplest thing to do. To do that, just open up another cmd.exe window and type:
ping 192.168.1.101
This command will send 4 ICMP (Internet Control Message Protocol) packets to 192.168.1.101. You can close this cmd.exe window if you wish. Because there was no existing MAC address in our computer’s ARP table, the ARP process needed to be performed again in order for the ping packets to be sent, and Wireshark should have captured those packets. You should be able to scroll over to the “Info” column in Wireshark and view the two MAC addresses that were supplied by both devices now. If you see nothing, double check your filter syntax or clear the IP to MAC address mapping again with the arp -d command, then send another ping.
Note the MAC address of the device you want to connect to. By default, Wireshark will translate the OUI (Organizational Unique Identifier, or the first 24 bits / 3 bytes of a MAC address) of some MAC addresses. For example, you can see in the Wireshark picture above that CadmusCo, SamsungE, and Asiarock have been translated. The OUI gives insight into which organization manufactured the NIC (network interface card) of a device, so you may be able to tell which MAC address you want to use for the next step just by seeing the OUI. If not, just remember that you’re using the MAC address from the Info field that’s different from the one you cleared earlier. Remember that the potential MAC addresses we will use come from the Info column–don’t use the one from the Destination column.
We are going to make a static IP address to MAC address mapping in our ARP table, now that we know the MAC address of the device whose IP address needs to be changed. In our example scenario, let’s say that we want to make a static mapping for IP address 192.168.1.101 to MAC address 08:00:27:2c:a0:81, since we cleared the mapping for MAC address 38:aa:3c:93:79:10 earlier. To do that, we type the following command:
arp -s 192.168.1.101 08-00-27-2c-a0-81
Note that MAC addresses can be displayed in a variety of formats. While Wireshark separates each byte with a colon, the arp command is expecting each byte to be separated with a hyphen. The command above will manually map 192.168.1.101 and 08:00:27:2c:a0:81 together, without relying on the ARP process. Use the arp -a command we used earlier again to look at your ARP list and make sure the correct MAC address and IP address match. Notice that it is now regarded as a static mapping instead of a dynamic mapping. If everything went smoothly, any traffic you send should make it to the device whose IP address needs to be changed. Now you can connect to that device using SSH, HTTP, Telnet, VNC, RDP or whatever else it is that you use, and reconfigure the IP address. Remember to delete the mapping with the arp -d command once you are finished changing that IP address.
And there you have it! I consider networking to be better when a car ride isn’t involved, and I hope this article prevents you from having to waste time, gas and possibly downtime on an improperly configured IP address.