How To Lock Your Screen On Mac OS X Mavericks

You really should lock your workstation when you’re away, regardless of your position or how much access you have to internal network resources. Windows makes this pretty simple by giving you access to the Windows Key + L shortcut which you can throw at any time to put your computer into password protected mode. With OS X 10.9 / Mavericks, it’s slightly more of an annoyance, but still possible.

Mac OS X Security & Privacy

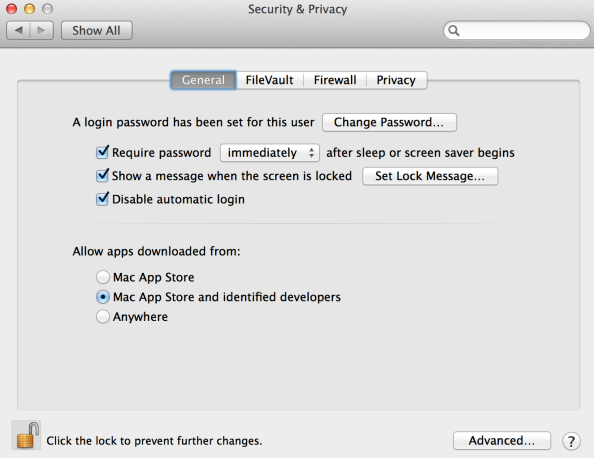
First we’ll choose Apple > System Preferences > Security & Privacy. Then you’ll want to make sure the box beside “Require password [immediately] after sleep or screen saver begins” is checked. At this point there’s a keyboard shortcut you can use to put your display to sleep immediately, and that is Control+Shift+[Power or Eject Button]. Because we set the option to require a password immediately after sleep begins, this doubles as a lock screen.

Mac OS X Hot Corners

Another option you have if you want something even faster and easier is using something called a “Hot Corner”. If you choose Apple > System Preferences > Desktop & Screen Saver > Screen Saver tab > “Hot Corners…”, you’ll have the option to choose a corner of your screen and a corresponding action for OS X to perform. The option we want is “Start Screen Saver”. I have a hot corner set at the bottom right of my screen to start the screen saver, so when I move my cursor to that position the screen saver starts automatically and my screen is locked with a password because of the option we set previously. All things considered, I think this is my preferred method of locking my computer, even though I do it accidentally on occasion.

How To Find Out What’s Taking Up Space On Your Hard Drive With WinDirStat

Alright, you’re out of space. Maybe you just need a few more megabytes (or even gigabytes) of hard drive space to install your latest computer game, or to accomodate that ever-growing, business-critical database. Maybe your hard drive is actually, literally, filled to capacity. Maybe you’ve uninstalled everything you were willing to get rid of, and even some things you weren’t, and it’s just not enough–you need more space! Now what?

WinDirStat is here to save the day! WinDirStat is a free program that scans your hard drive and creates a visual representation of what’s hogging all of your precious bytes. After starting up the program, you choose which drive or drives you want to scan, and then you’re given a color-coded map where each section represents a folder. The biggest files correspond to the biggest squares, so you can quickly track them down. Hovering over a file with your mouse cursor shows you exactly where it exists in the directory tree, and right-clicking allows you to open Windows Explorer at the relevant location or even a command prompt with that folder as the current working directory. It’s incredibly useful for tracking down files you didn’t know you had–whether they are pictures or music files that you forgot about or lingering remnants of a program you already uninstalled.

Personally, I tend to find operating system images that I put in an obscure place, giving me the opportunity to free up a gigabyte or two. I’m also a bit of pack rat when it comes to game save files and I keep hundreds of saves when I play through a game like Skyrim just in case I want to come back to any point in the game, perhaps before a particular event or before I offed an important character. Sometimes these files can be a few megabytes a piece, so do the math and you’ll realize that 300 saves adds up quickly. Please remember to be absolutely careful when deleting files from your computer. Make sure they are not critical system files and do research on anything you’re not 100% sure about deleting. Another personal suggestion I have is to avoid scanning multiple hard drives at once, because their visual representation shares the same space and the smaller files can get drowned out.

You can download WinDirStat from www.windirstat.info. Additionally, instructions on how to obtain alternate software for Linux and Mac are available on the site.

Why You Shouldn’t Allow root Login for SSH

A few years ago, a team of students and I did some research on my university’s honeypot network and put together a little presentation about what we found. For those not in the know, a honeypot is a purposefully exposed network system intended to either divert the attention of hackers from production systems or gather information about how hackers compromise systems and the tools they use to do it. While we did gather some information about various default ports that were scanned and attacked, the main focus of the project was on SSH. By using Kippo, a specially designed SSH honeypot service, we were able to acquire information about the usernames and passwords that were used to make SSH connection attempts, and see what commands were issued after a successful login.

The main takeaway regarding what we found is just how often root is used as the username in SSH brute force attacks. In fact, just over 64% of the SSH login attempts made on our honeypot were using root. I won’t be so brazen as to claim that 64% of the entire world’s SSH login attempts use root, but it is an alarming percentage even in a research scenario. If you could invalidate 64% or even half that percentage of attacks on your SSH-enabled systems, why wouldn’t you? Just why is root the low hanging fruit when it comes to attempted SSH logins? Well, it’s guaranteed to exist, and compromising the account gives you total and complete control over the system. Of course there are other ways to restrict SSH traffic using firewalls or VPN technologies, but if you aren’t very network savvy, disabling root access for SSH is a quick and achievable goal. Sometimes I think of the username as almost a sort of password. Of course a username is usually much easier to come across, since they are typically stored in plaintext or viewable by other users on a machine. But as far as a random brute force attack on an SSH service goes, it’s just another piece of information that the attacker isn’t likely to have in advance. So, feel free to create a custom account for SSH that isn’t something you’d expect someone to guess.

On the other end of the SSH login we have the password itself. The top passwords in use were very simple, as expected. “123456” was our top password, with “password” trailing behind in second place. “qwerty”, “test”, and “root” also make an appearance shortly after. It should go without saying that you shouldn’t use a simple password. Application and hardware-specific default usernames and passwords should also be changed or disabled–hackers and hacking tools take these into account.

Creating a strong password and restricting SSH access to specific users should always be one of the first steps to hardening an SSH service. Go forth and lock down your SSH service!

How To Use grep To Parse A Linux DHCP Lease File

If you’re using a Linux solution for your DHCP server, you can use cat and grep to quickly locate the IP address of a particular host based on their hostname. On our OpenSUSE Linux DHCP server, the DHCP lease file is stored at /var/lib/dhcp/db/dhcpd.leases. CentOS/Red Hat Enterprise Linux has the lease file at the same path minus the “db” directory, so it is at /var/lib/dhcp/dhcpd.leases. If we run a tail or cat on that log file, we can see some examples of a lease:

tail -27 /var/lib/dhcp/db/dhcpd.leases

This command will display the last 27 lines of the specified file, which happens to be the lease file in this case. The output we receive is seen below:

lease 10.10.0.216 {
starts 2 2013/06/25 00:03:59;
ends 3 2013/06/26 00:03:59;
binding state active;
next binding state free;
hardware ethernet 00:50:56:a3:44:2b;
uid “\001@l\217’\361\021”;
client-hostname “Frodo”;
}
lease 10.10.0.210 {
starts 2 2013/06/25 00:04:04;
ends 3 2013/06/26 00:04:04;
binding state active;
next binding state free;
hardware ethernet 40:6c:8f:27:f1:11;
uid “\001@l\114’\214\219”;
client-hostname “Bilbo”;
}
lease 10.10.1.1 {
starts 2 2013/06/25 00:08:09;
ends 3 2013/06/26 00:08:09;
binding state active;
next binding state free;
hardware ethernet 7c:6d:62:bf:87:e6;
uid “\001|mb\277\207\346”;
client-hostname “Aragorn”;
}

There are three leases for three different hosts shown above. Depending on your network there may be hundreds of leases, if not more, so searching  through them manually is a pain. Now that we know the format of the leases, we can use cat, pipe it to grep with some arguments, and find the IP address of a particular host using the hostname. Here’s the command we will use:

cat /var/lib/dhcp/db/dhcpd.leases | grep Bilbo -B 7 -A 1

In this command, cat will display the entire contents of a file on the screen, but then using the special character “pipe” (seen between “leases” and “grep”), we send the output of the cat command to the grep command. grep will print the entire line containing any string (text) that matches the string we supply. In this case, we have supplied the string, “Bilbo”, since that is the hostname we are hypothetically looking for. Without the -B 7 and -A 1 arguments, the output of the command would be only a single line:

client-hostname “Bilbo”;

But since we did use -B 7 and -A 1 arguments, we will receive the client-hostname line along with the 7 lines immediately above it and the 1 line directly below it:

lease 10.10.0.210 {
starts 2 2013/06/25 00:04:04;
ends 3 2013/06/26 00:04:04;
binding state active;
next binding state free;
hardware ethernet 40:6c:8f:27:f1:11;
uid “\001@l\217’\361\021”;
client-hostname “Bilbo”;
}

The curly bracket below the client-hostname line isn’t exactly important information–I’m just showing an example using both the -A and -B arguments. Finally, we’ll see how to display only the information we are looking for: the hostname and the IP address. What we need to do is use a grep command to match two different strings instead of just one. For that, we will use egrep, a special use of grep which allows us to use regular expressions. The command looks like this:

cat /var/lib/dhcp/db/dhcpd.leases | grep Bilbo -B 7 -A 1 | egrep 'Bilbo|lease'

It is the same command until the second pipe, where we use egrep to match both “Bilbo” and “lease”. Notice that this command uses single quotation marks. Now our output is nice and clean, and only relates the two pieces of information we care about:

lease 10.10.0.210 {
client-hostname “Bilbo”;

If we have more than one entry for “Bilbo”, the last one is the current or most recent entry. And that’s it for this article! Of course, if you had a client management solution which kept track of all client IP addresses, you wouldn’t even need to do this. But this method definitely beats walking a user through opening cmd.exe and typing ipconfig and reading you their IP address! You could also use a program like Angry IP Scanner to scan your network and resolve IP addresses to hostnames.