
How To Use Wireshark on a Mac to See 802.11 Headers and Find Wireless Devices
In this post, we are going to use the Airport NIC on a Macbook Pro or Air in order to view 802.11 and Radiotap headers using Wireshark. Utilizing the Airport card we can gain access to some useful layer 2 wireless information including signal strength, channel frequency and data rate, and see interesting packets such as beacon frames as well. Let’s have some fun!
The first step is to own a Macbook Air or Macbook Pro with an Airport card. Unfortunately, the vast majority of laptops natively running Windows won’t allow you to see layer 2 wireless information, as it is a restricted function of the NIC. You can technically still get access to the same information with a Windows laptop, but you’ll need a third party device such as Riverbed’s AirPcap. Spoiler alert: they are pretty expensive!
The next step is to download Wireshark from www.wireshark.org. Wireshark is a packet analysis tool–probably the best in the industry–and it has the added benefit of being free and open source! I’m using Wireshark version 1.10.6 on Mac OS X 10.9.3 (Mavericks) for this tutorial. When you launch Wireshark for the first time, it will need to configure a graphics utility named XQuartz in order to run, and that can take several minutes. While we are waiting, let’s make a configuration change that will allow us to interact with the Airport card.
Mac OS X has a built-in command line utility that will allow us to configure the Airport card, but it’s not in an easy to access place. We’re going to fix that by typing the following command in Terminal:
sudo ln -s /System/Library/PrivateFrameworks/Apple80211.framework/Versions/Current/Resources/airport /usr/sbin/airport
Let’s break down the command:
sudo – run the following command as the root user
ln – create a link from the second file to the first file
-s – supplied to the ln utility to denote that this will be a “symbolic” link. That means when we refer to /usr/sbin/airport, it points to /System/Library/PrivateFrameworks/…/airport, but we don’t need to disturb the current location of the file.
The last piece of important info is that we created the symbolic link in the /usr/sbin directory, which allows us to run the command without having to specify the full path. In other words, now we have an airport command. Neat!
If you type airport by itself and press enter, you will receive some information about using the airport utility (for any other use of the airport command, we will need to type sudo in front of it to run it as the root user). We are most interested in the -z and -c arguments. For instance, if you type sudo airport -z, it will force disassociation with any wireless networks that the Mac is connected to. We need to do that first in some instances so that we can specify what channel or frequency of traffic we want to capture with the -c command. This is because the Airport NIC can only capture traffic from one frequency at a time, so if it is associated with a wireless SSID, you will be forced to capture traffic on the frequency that SSID is operating on. In order to capture traffic on the most common 2.4 ghz channels, we can type sudo airport -c1, sudo airport -c6, or sudo airport -c11 in order to capture traffic on channels 1, 6, or 11 respectively. We can also select 5 ghz channels, with sudo airport -c157 for example. See more about wireless network channels here: http://en.wikipedia.org/wiki/List_of_WLAN_channels.
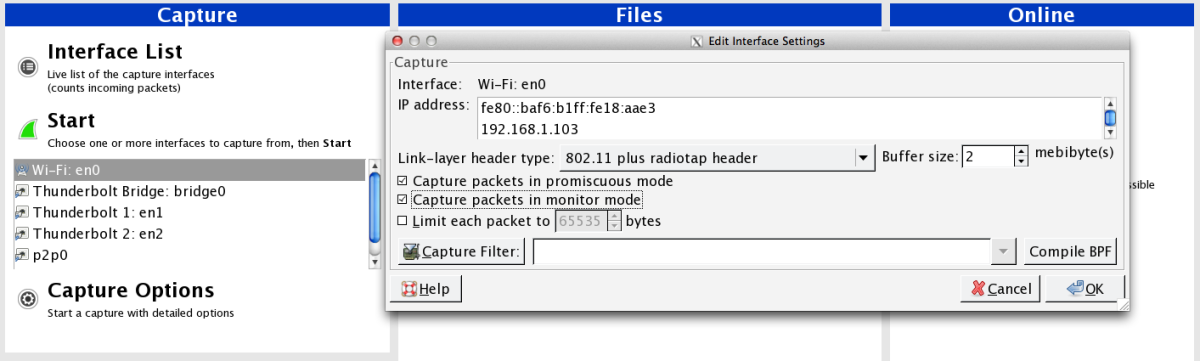
Hopefully by this point Wireshark is ready to launch, so spin it up! When it opens, you will see a list of interfaces on the left-hand side of the screen, such as “Wi-Fi: en0”, and “Thunderbolt1: en1” (if you have a Thunderbolt port). Double click on “Wi-Fi: en0”, make sure the boxes are checked for “Capture packets in promiscuous mode” (capture packets that aren’t addressed specifically to our Mac) and “Capture packets in monitor mode” (allow us to see 802.11 and Radiotap headers), then choose “OK”. Now start a new live capture by clicking the green shark fin near the top left of the Wireshark window. If there are any wireless devices communicating on the frequency that your Mac is listening in on, you should begin to see packet data in the middle pane. If you don’t, try changing the frequency using the terminal commands in the previous paragraph. Remember that you will not see any traffic if you are not tuned into a wireless channel that is in use near your Mac.
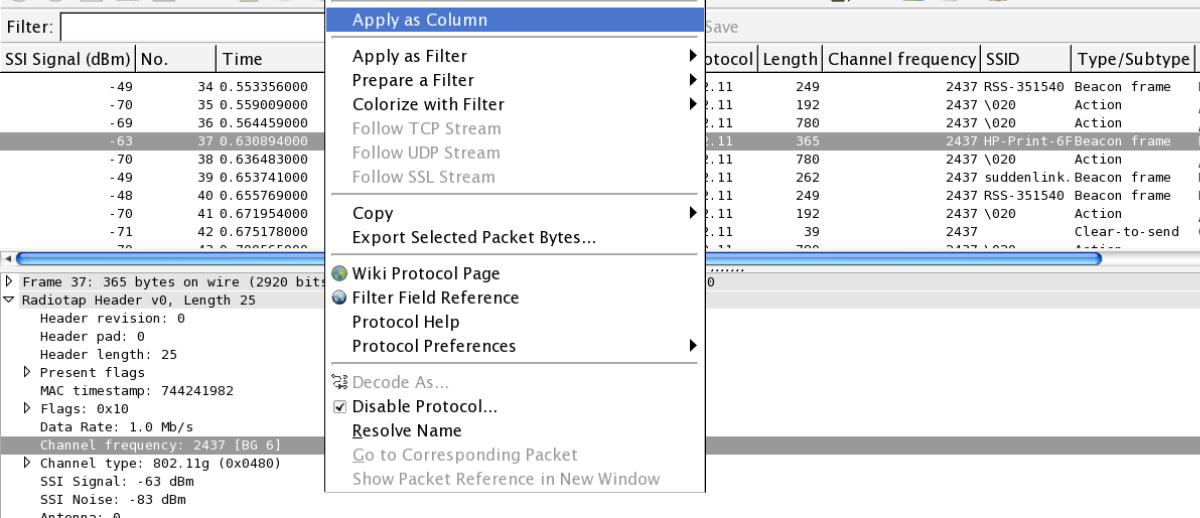
The default columns don’t reveal much of the information we are seeking, so let’s edit them. If the packets are scrolling by too fast for you, click the red stop button near the green shark fin button you clicked earlier. Click on one of the packets in the packet list pane so that the packet is horizontally highlighted, then move your attention to the pane below which is known as the packet details pane. Click the little arrow to the left of “Radiotap Header …” and you should see some information such as “Data Rate”, “Channel frequency”, “Channel type” etc. Some interesting pieces of information we may wish to add to the available columns are the channel frequency and SSI signal. The channel frequency is the actual frequency number which corresponds to the short channel name. For example, channel frequency 2437 corresponds to channel 6. SSI stands for “Signal Strength Indicator” and this value tells us how strong the received signal was on a particular packet. If we ignore the negative sign, we can simply say that the lower the number, the better the signal strength is. For example, an SSI of -60 indicates a stronger signal than -80. To add these pieces of information as columns, right click on each field and select “Apply as Column”. Now this information is easily accessible from the packet list pane and we won’t have to dig for it in the packet details pane. If you’d like to rearrange your columns, feel free to do so by left clicking the column name and dragging it left or right.
Let’s add two more columns. Find a beacon frame by scrolling through the packet list pane until you see one that has “Beacon frame …” in the Info column. Select the packet and left click on the arrow beside “Radiotap Header …” again in the packet details pane so that the information collapses. Now left click on “IEEE 802.11 Beacon frame …”, right click the first field which is “Type/Subtype” and apply that field as a column. Collapse “IEEE 802.11 Beacon frame …” and expand “IEEE 802.11 wireless LAN management frame” by left clicking their respective arrows. Expand “Tagged parameters”, then expand “Tag: SSID parameter set: …” if it is not already expanded. Right-click on “SSID: …” and apply that field as a column. At this point we can see the 802.11 frame type as well as the SSID which originated each packet. If you stopped your packet capture earlier, you can start it again by clicking the green shark fin again.
Now, what can you do with this setup? I have used it to track down printers which are broadcasting their own wireless networks in corporate environments, as well as to track down access points whose physical location was undocumented. You could also use it to locate rogue devices or any wireless client such as a laptop or cell phone. To hone in on a particular device, find a packet which has originated from it, right-click the MAC address of the device in the “Source” column and choose “Apply as filter > Selected”. This will filter out all captured traffic in the packet list pane so that only packets with a matching source MAC address will appear. While you have a live capture running, you can see a very clear indication of how close your laptop is to the device by examining the SSI Signal column we added earlier. In my experience, -80 to -90 indicates a device which is pretty far away but could still be in the same building, -60 to -80 may indicate that you are within 50 feet of a device, -40 usually means you are pretty much in the same room with the device, and -10 to -20 is seen when you are inches away from the device. Take these numbers with a grain of salt, as the power of the source radio and the construction of the building may alter your expected SSI’s. I have also found that pointing the Apple logo on the back of your Mac straight at a device will guarantee the best SSI, so you can use that to your advantage when searching for devices.
