How a Toshiba Copier DoS’d Our Network Using ARP

A few years ago, I ran into an interesting networking problem. Some of our users at a particular site were reporting that they couldn’t connect to the network, and we quickly realized that it appeared to be a DHCP problem, as those users who were complaining couldn’t get an IP address. As we were checking the DHCP service, we realized that Windows XP computers weren’t being affected–it was only Windows 7 users who could not get an IP address. How strange!

I was quite the novice Wireshark user at the time, but since we had been using it in my university classes, I decided to fire it up and check things out from a packet level perspective. Part of the trace file I captured is displayed below and it has had all but the relevant packets removed for the purposes of this article.

dhcpissue

Shown here is a single DHCP exchange which resulted in the requesting client failing to hold onto the given IP address. The traffic from the DHCP client, a Dell Windows 7 computer, is colored green, while the traffic from our DHCP server is colored yellow. The gray packet is a response from the gateway for a request for its MAC address originating from our DHCP client. The packet marked in red is the evil packet–it came from the Toshiba copier on the network.

Up until packet 8, everything was going fine. In packet 1, our Windows 7 computer came alive, saw that he was configured for DHCP, and broadcasted a DHCP Discover packet on the network. Our DHCP server checked for an available IP address, found that 10.18.2.7 was free, sent an ARP broadcast to see if any clients were currently using that address, seen in packet 2, and then sent a DHCP Offer to allow our computer to have that address in packet 3. The Request and ACK in subsequent packets 4 and 5 finalized the DHCP process. Packet 6 displays our Windows 7 computer sending an ARP broadcast for the gateway’s MAC address, and packet 7 shows a response for that request from the gateway. In packet 8, a Toshiba copier also wants to know who has 10.18.2.7, and requests that the response be sent to 0.0.0.0, but that isn’t a valid IP address. Our Windows 7 computer gets the sense that something is wrong, and releases his IP address in packet 9. We are kicked off the network!

So, why was this happening? It turns out that the Toshiba copier was plugged into the network, but not configured with an IP address. So, the copier literally had an address of 0.0.0.0, which is bad! In fact, you can’t configure an IP address of 0.0.0.0 on most devices, as its a special reserved address. It happens to be the source IP address of DHCP clients before they receive a real IP address from the DHCP server. My guess is that, for whatever reason, this Toshiba copier likes to immediately update its ARP table whenever a new host is discovered on the network (i.e. whenever a DHCP process is completed). Unfortunately, its ARP request to tell 0.0.0.0 about the MAC address of the new client is read by that new client as a check to see if that IP address is in use. In other words, the new DHCP client thinks another client wants to use the address it just accepted, and so it releases it to avoid an IP address conflict. With this problem consistently occurring, our Windows 7 computer will never get an IP address. It’s worth stating that, in my personal opinion, Toshiba or the NIC manufacturer for the Toshiba copier dropped the ball here, as you shouldn’t be allowed to configure an IP address of 0.0.0.0 in the first place, and it definitely shouldn’t be the default setting out of the box.

I was able to replicate this issue on my personal VMWare test network using Nping, a utility that can generate custom network packets. Since this behavior is present on a virtualized Windows 7 machine, I have to conclude that it is not a response specific to Dell computers/NICs which is what we were using in our environment at the time. In fact, my guess would be that most modern OS’s would have a similar response to this situation. If you see this issue in the future, the immediate fix is to configure a real IP address on the device, physically disconnect the offending device from the network, or shut down the switchport that the device is connected to.

How To Use Multiple Google Accounts in Chrome

I like to use Google Music while I’m at work sometimes, and I use it through my own personal Google account. Unfortunately we also use Gmail as our enterprise e-mail solution, and normally Chrome doesn’t like it when you try to sign into two different Google accounts in the same instance. The result is that when I try to log in to listen to Google Music it kicks me out of my work e-mail. I used to solve this problem by running Firefox and Chrome at the same time, but it’s a silly and inelegant workaround.

Thankfully, I’ve found that Chrome has a nifty feature that will let you run different instances that are attached to separate Google accounts. To access this feature, choose the menu button in Chrome, click Settings, and click “Add new user…” underneath users. You can choose an icon and “friendly name” for each user, like “work” and “personal”, and you also have the option to add a desktop shortcut for the account. After that, you’re prompted to sign into the relevant Google account. Once you have one or more accounts configured, you can always access your alternate accounts by left-clicking the icon at the top left of the Chrome window and choosing that account. If the account does not have a running Chrome instance associated with it, a new instance will be launched.

This setup allows me to stay productive at work while also being able to access Google Music. I hope this information helps you too!


How To Remotely Fix a Device With a Duplicate IP Address

Maybe your intern configured a device with a static IP address that was already in use. Or maybe it was you (shh, I won’t tell). But don’t fret! Assuming your misconfigured device has remote access capability of some sort, you may be able to fix the problem without physically being on site!

If you can access the device you want to change the IP address on already, then go ahead and do so–this article isn’t necessary. However, if pinging or remotely connecting to the IP address only takes you to the device that needs to retain the IP address, read on!

You’ll need a packet capture tool like Wireshark (Windows and Mac OS X) or tcpdump (Linux) to begin with, so go ahead and grab that. Wireshark is available from www.wireshark.org and that’s what we will be using in this article. If you’re on the same network as the devices with the duplicate IP, you can run Wireshark or tcpdump on your own computer. If your misconfigured device is on another network, you’ll need to connect to a computer or server on that network and run Wireshark from there.

What we will need to do is view the ARP (Address Resolution Protocol) process in order to grab the MAC address of the device we want to connect to. ARP allows devices to send a broadcast (something that goes to all clients on the network) requesting the MAC address of a particular IP address. A network device needs both the MAC address (also called the physical address) and the IP address (also known as the logical address) in order to send most types of network traffic. If you have been pinging or trying to access the device with the duplicate IP on your same network, your computer has likely already associated the “wrong” MAC address to that IP address. You will know this if your attempts to connect to the device whose IP you want to change actually go to the device whose IP needs to be retained.

In our example, we have a situation mimicking what’s described above: two devices have an IP address of 192.168.1.101, and our attempts to connect to the one we want to change are sent to the device whose IP address should be kept. The first thing we want to do is clear the IP address to MAC address mapping that our computer has. We open up cmd.exe and type:

arp -a | findstr 192.168.1.101

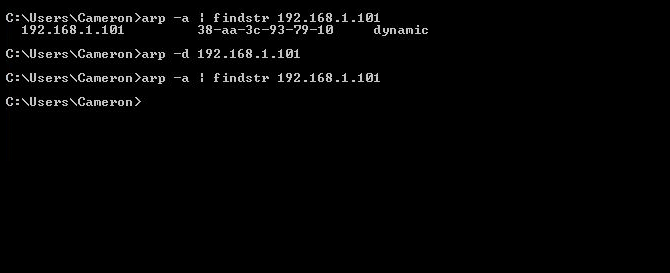
The arp command allows you to interact with the ARP table on a Windows machine. We supply the -a parameter in order to display the ARP table on the screen. Once we “pipe” the output of the command to the findstr command and supply findstr with the relevant IP address, it ensures that the only lines that are printed contain that IP address.  If nothing is returned for you, you’re good to move on. However, in our example, there is an entry here and it is for the wrong MAC address, so we need to clear it. We use the following command to do that:

arp -d IP_address_here

Again we are using the arp command, but this time we use the -d argument and supply the IP address again. This will clear the association of the IP address to the MAC address. We run the initial command again to make sure the mapping is indeed gone. If it isn’t, your computer is probably sending traffic to that address. You can either find the process that is sending traffic and stop it (maybe you left a ping running?), or just be aware that you will have to perform the arp -d step again later on. This is what my example cmd.exe window looks like after running the previous commands:

arp2

I found that there was an entry for the IP address, cleared it, and checked to make sure it was cleared. Our bad MAC address mapping is gone! Now we can run our packet capture tool and see the ARP process. Open up Wireshark and choose “Capture > Interfaces.” Select the box that represents your network interface and choose “Start” to begin capturing traffic. You should start seeing lines of packets show up. Don’t be intimidated if it’s moving quickly, we will cut down on the chatter! Let’s filter the traffic to see exactly what we want. In the filter field, copy and paste this line of text, making sure to press enter after pasting it in:

arp.src.proto_ipv4 == 192.168.1.101

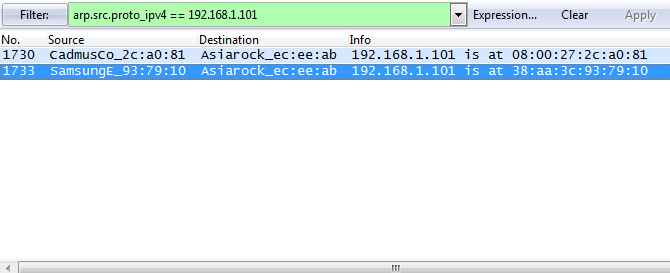
Again, we are using 192.168.1.101 in our example. You will use the IP address of your devices instead. Your filter field (shown in green) should look like the one below, but you probably won’t see the ARP packets (lines 1730 and 1733 in the example picture) until you perform the next step, so don’t worry about that just yet. If your filter field is red, you’ve typed something wrong. The syntax is very important!

arp

Using this filter, Wireshark will only display ARP traffic that has a sender IP address of 192.168.1.101. Now to force the ARP process, you can ping the IP address or attempt to send any traffic to it, like a remote connection, while the packet capture is still running. Pinging the IP address is probably the simplest thing to do. To do that, just open up another cmd.exe window and type:

ping 192.168.1.101

This command will send 4 ICMP (Internet Control Message Protocol) packets to 192.168.1.101. You can close this cmd.exe window if you wish. Because there was no existing MAC address in our computer’s ARP table, the ARP process needed to be performed again in order for the ping packets to be sent, and Wireshark should have captured those packets. You should be able to scroll over to the “Info” column in Wireshark and view the two MAC addresses that were supplied by both devices now. If you see nothing, double check your filter syntax or clear the IP to MAC address mapping again with the arp -d command, then send another ping.

Note the MAC address of the device you want to connect to. By default, Wireshark will translate the OUI (Organizational Unique Identifier, or the first 24 bits / 3 bytes of a MAC address) of some MAC addresses. For example, you can see in the Wireshark picture above that CadmusCo, SamsungE, and Asiarock have been translated. The OUI gives insight into which organization manufactured the NIC (network interface card) of a device, so you may be able to tell which MAC address you want to use for the next step just by seeing the OUI. If not, just remember that you’re using the MAC address from the Info field that’s different from the one you cleared earlier. Remember that the potential MAC addresses we will use come from the Info column–don’t use the one from the Destination column.

We are going to make a static IP address to MAC address mapping in our ARP table, now that we know the MAC address of the device whose IP address needs to be changed. In our example scenario, let’s say that we want to make a static mapping for IP address 192.168.1.101 to MAC address 08:00:27:2c:a0:81, since we cleared the mapping for MAC address 38:aa:3c:93:79:10 earlier. To do that, we type the following command:

arp -s 192.168.1.101 08-00-27-2c-a0-81

Note that MAC addresses can be displayed in a variety of formats. While Wireshark separates each byte with a colon, the arp command is expecting each byte to be separated with a hyphen. The command above will manually map 192.168.1.101 and 08:00:27:2c:a0:81 together, without relying on the ARP process. Use the arp -a command we used earlier again to look at your ARP list and make sure the correct MAC address and IP address match. Notice that it is now regarded as a static mapping instead of a dynamic mapping. If everything went smoothly, any traffic you send should make it to the device whose IP address needs to be changed. Now you can connect to that device using SSH, HTTP, Telnet, VNC, RDP or whatever else it is that you use, and reconfigure the IP address. Remember to delete the mapping with the arp -d command once you are finished changing that IP address.

And there you have it! I consider networking to be better when a car ride isn’t involved, and I hope this article prevents you from having to waste time, gas and possibly downtime on an improperly configured IP address.